Showing posts with label Native Americans. Show all posts

Friday, January 6, 2012

Archaeology Adventure Archaeological Dig Activity Kit

Three years ago, I started teaching 4th grade. I was determined to make as much of my curriculum fun as I could. So anytime anything wasn't fun, I noticed. I'm sad to say that of all the subjects I taught that year, Alabama history was fun least often. I had not had Alabama history since I had been a 4th grade student myself. I remembered some things about Alabama history from back then (believe it or not), and some subjects in Alabama history were really just American history with Alabama contributions mixed in. The purely Alabama history subjects that were about areas other than the one in which I live were read from the book and discuss lessons. BO-ring.

One of those BO-ring lessons that stood out in my mind was the lesson about Moundville, a place where early Native Americans buried their dead in huge mounds along with their earthly possessions. After that lesson, I felt that the students just didn't "get" how cool Moundville is. They didn't get how cool it is that the mounds still exist, that artifacts are still being found even though the people lived in an ancient time, and that archaeologists are able to learn what those people were like based on what they found/are finding.

So, two summers ago, I was determined to find and make resources to make my history lessons more meaningful and fun. The first thing I did was look for something like this:
An archaeology kit that allows an entire class of students to experience an archaeological dig. But I didn't find it until today!

I did find other kits that were hundreds or even thousands of dollars. Some of those had real artifacts that had to be sent back...completely intact. Yeah right. I teach elementary school...and I am clumsier than my students.

This kit looks great and appropriate for elementary school. The kit includes many artifacts which include beads, arrowheads, pottery shards (that will piece together to make pottery), animal bones (replications), and shells, as well as an archaeology digging screen. The teacher can simulate these into an actual dig site (like in the dirt outside) so that the kids can participate in an excavation, and the students can draw conclusions based on the artifacts after they have dug them up.

The kit costs $69.95 and includes enough artifacts for 25 students to make arrowhead necklaces. They also offer refill packs of arrowheads, bones, beads, shells, and necklace cords that can be bought for groups larger than 25. Personally, I would probably save the artifacts and reuse them, but the necklaces look like fun, too! Visit the website to see refill prices.

Caution:
The teacher will have to supply digging tools for the class. I am going to look for some, and I will let you know as soon as I find some!

UPDATE:
I found the following tools (4 out of 5 came from Amazon.com) that may work well for this archaeology dig activity:

This set includes 12 wax carvers that look a whole lot like some of the archaeologist tools I have seen on the Internet. There are other pictures of these on the website, and they look pretty blunt, but I do not know that for sure. They are not all they same, but they do not all need to be the same. For this activity, I just want the kids to get the idea of what archaeologists do.

Since I live in an area of Alabama clay (yep that famous red dirt that Warner Von Braun thought would be magnificent for NASA), I think these wax carvers would be great for getting that thick stuff off of whatever is buried in it. [I need to find an area that has a good mix of dirt and clay...or the following sieves will have no point.]

These would be great for sifting dirt. I'm not sure how big they are though; they look pretty small.

This set includes 4 buckets - 3 with sieve bottoms and 1 with a solid bottom. The buckets are pretty small, they are 7" high.

Let me pause now and point out that it may be wise to ask any teachers in the younger grades if they have any of these kinds of play toys that they use in sand and/or water tables that you may borrow. You may even want to e-mail the staff at school to see if anyone with young children have these kinds of toys you can borrow. ...Just a thought...and now to continue:
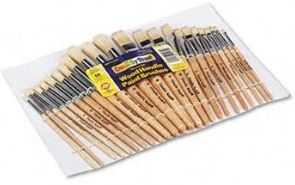
You probably already have paintbrushes or you know where you can borrow some. If not, these are pretty cool. This set includes a 24 pack of assorted paintbrushes. You can actually get them cheaper on the same site ($7.33 on Amazon), but you would have to pay shipping.

If you would like to go the extra mile...
This kit comes with 4 brushes, 4 sieves, and 24 plastic dinosaur skeletons. The brushes and sieves would be useful for this archaeology excavation, and this kit is actually pretty cheap.
If the dinosaur skeletons do not break easily, it may be fun to bake the little plastic dinosaur skeletons into big sheet cakes or individual cupcakes for a paleontology excavation activity. A variety of sweets could even be used to make strata - pudding, packed crushed oreos, cake, frosting, etc. I'm not sure how easily the dinosaurs break, so use caution when deciding whether or not to use that idea.

Let me know if you and/or your class use these activities! I would love to hear about it. I would love to see photos, too!

Enjoy!

Tuesday, October 25, 2011

National Geographic Kid's On the Trail of Captain John Smith: A Jamestown Adventure "Game"

I personally e-mailed National Geographic to tell them how much I love this game and that I feel that they should make MORE of them! It is so much more than a game. It is a cartoon-style video of the story of Jamestown that follows the story of John Smith. There are eight mini episodes, and there are mini-games after six of the episodes. Students will learn something through every episode and every game - SO cool. Each mini episode is about 2-3 minutes long, and each mini game is about 1-2 minutes long. I had such a great time with this interactive activity that I decided to share it here before posting it to the website! Although it will be on the student history page soon, here is the link for those of you who would like it a bit sooner: http://kids.nationalgeographic.com/kids/games/interactiveadventures/john-smith/

Thursday, October 20, 2011

New History Activities! Early American Settlements and The First Thanksgiving

So, I got around to some of the history links sooner than I thought! I posted eleven new history activities on the student history page in a new section called Early American Settlements and The First Thanksgiving. The subjects of the activities include Pilgrims, Wampanoag Native Americans, the Mayflower, the First Thanksgiving, and more. There are even panoramic views of Plimoth Plantation and the inside of a Wampanoag home! I'm sure you and your students will love every activity!

Enjoy!

Wednesday, October 19, 2011

Free Plimoth Plantation Virtual Field Trips!

I have found so many amazing Alabama and American history resources in the last few days that it is absolutly overwhelmingly ridiculous. I cannot decide exactly how I want to post all of them on the website, because I can't decide if I want to make some of them in a TrackStar, if I should post them on the student page, or if I should post them on the teacher page. There are several resources coming, though!

In the meantime, Scholastic is offering FREE Plimoth Plantation Virtual Field Trips just in time for Thanksgiving 2011! And, yes, it is actually spelled P-l-i-m-o-t-h. The first one is November 2 at 1:00pm ET (2:00pm for all of you who are CT like me!) and is a tour of the Pilgrim Village. The second one is November 9 at 1:00pm ET/ 2:00pm CT and is a tour of the Wampanoag Homesite. The third one is a Webcast Replay on November 16 at 1:00pm ET/ 2:00pm CT. You will even receive a series of e-mails from a Pilgrim girl and a Wampanoag boy with your registration.

These virtual field trips will include daily life of the Pilgrims and the Wampanoag and interviews of the interpreters (actors) of Plimoth Plantation. I am SO excited to participate in these virtual field trips!

To register click here!

Friday, September 30, 2011

Cherokee Cornmeal Cookies

Here is the Cherokee Cornmeal Cookies Recipe I promised!  Making the cookies was the reward of the winning team from the At-Home Native American Poster Project, but everyone got to eat them! We made these in my old college toaster oven, and they were delicious! I brought some sorghum molasses for the kids to try, too, since it is a local/Southern product. I wait all year for sorghum molasses to be sold at the farmers' market. A lot of the kids dipped their cookies in the molasses or poured the molasses over the cookies pancake style. With this particular class, the rest of the class just watched the eight winning students make the cookies. You may want to give the rest of your students something to work on if you aren't sure if they can handle just watching, though.

I do recommend that you bake one batch before the class makes the cookies. I gave each student one of the cookies I made the night before, and one hot from the toaster oven. I was completely amazed by how good they were, and so were the kids!

Enjoy!

Thursday, September 29, 2011

At-Home Native American Poster Project

Gee, I wish you could see the projects a little better in this photo... and that the students had all completed their projects vertically so they didn't hang in front of each other, but you know what they say about the best laid plans... Anyway, here is another "at-home" Alabama history project. I do let students research at school in the computer lab, but the rest of this project is completed at home! Those of you who are familiar with my projects are probably already familiar with “team points,” but for those of you who are not, here is an explanation of the Requirements Letter and Rubric w/Grade and Team Points:

When I copy the letter, I make the letter the front and the rubric the back so that everyone is sure to have the requirements. Before I give them out, I fill in equal numbers of each tribe in the "assigned" blank at the top of the letter, and then I give out the letters at random. As with everything else, I go over every single part of the letter and rubric with my students.

Since students tend to have limited research skills in 4th grade, I did include some wonderful websites for each of the four major Alabama Native American tribes in the requirements letter. Each of the websites in that letter is more or less a database of sorts in which students can definitely find the information needed to satisfy each of the rubric requirements, and I make sure students know that I know this fact.

I am always torn as a teacher when making requirements for projects. Truth be told, if all students were able to do what I most wanted in a reasonable time-frame, projects would be covered in relevant pictures, photos, and interesting information. The reality is, though, that most students are just starting to learn how to research and assemble a project. There are a lot of students who can give me the awesome projects I want, though, and actually want that challenge. How do I meet the needs of all of my students (and my selfish want for super-incredible-beyond-4th-grade-awesome-work)? My answer is team points.

If you look at the rubric, there is a column for grade points, and there is one for team points. As described in the letter,  grade points are the points that add up to a student's grade in the gradebook for this project. Team points, though, are earned by doing what is required, and extra team points are earned by doing what I would personally like for them to do. Extra team points are earned for extra pictures, interesting facts, creativity, etc.

I group students based on their ability levels (yep, levels - how well they do in history, how well they work in general, how well they research, etc.) to make equitable groups using this Native American Project Groups Sheet (MS Word Version). For this particular project, I do not tell the students who is on whose team. I just keep the group divisions to myself, and after I grade everyone's projects, I fill in each student's team points on the sheet. Then, I add up the points for each group, and the team with the highest score wins a prize which is usually an activity that benefits the entire class.

For this particular project, the prize for the winning team last year was making Cherokee Cornmeal Cookies from scratch for the class which was a huge hit! I promise to post that activity soon.

You will be surprised which students have the most team points and which students have the least. I am always amazed by which students are incredibly motivated to go above and beyond for team points.

Enjoy!

Moundville Artifact Cards Match Activity

I made this activity from the information and photos I found on the Smithsonian's Museum of the American Indian Collection website, and I completely recommend that you check out that website! Everything for the activity is included in this Moundville Artifact Cards Activity.
How to Prepare the Activity:
For each group in your class (4-6 students), make one set of cards:
  1. Print the cards from the Moundville Artifact Cards Activity onto white cardstock.
  2. Laminate the cards, and cut them apart.
  3. I recommend that you mark the back of the cards in some way to distinguish each set. Write an "A" on the back of all of one set, "B" on the next set, etc.
  4. Separate each set into picture cards (the ones with pictures) and catalog cards (the ones with words). Each set of cards will need a baggie to store the picture cards and a baggie to store the catalog cards. I recommend marking the baggies the same way you mark the back of the cards (For example, if you marked the back of the cards in a set with an "A," the two baggies for that set would also be marked with an "A.").

How I Use this Activity:
  1. I give each student a Moundville Museum Artifact Guesses Sheet. I explain to the students that each group will get a set of cards with pictures of real artifacts from Moundville, but the cards will not say what the items in the pictures are. The students have to guess what is in the pictures, and they write their guesses on the "Guess" side of the table on their worksheet. 
  2. I give out the cards, and the students can discuss with other members of their group as they guess if they would like. Depending on your students, this part of the activity could take anywhere from 15 minutes to an hour.
  3. For the second part of the activity (which sometimes ends up taking place the next day), I give out the catalog cards, too. The students have to try to match the pictures to the descriptions in the catalog cards. Inevitably, they discover that they have to work as a group for this part, but I have never told them to do so. I let them spread out in the floor if they want. After they think they know which cards match, I ask them to write their new "educated" guesses in the "Museum Guess" column. [If pressed for time, you can ask them to just write the catalog numbers in the top right corners of the catalog cards.]
  4. There is more than one way to do the last part of the lesson.
    1. You can go to the Smithsonian's Museum of the American Indian Collection website, and demonstrate how to enter a catalog number in the search box to find the picture of that item. Let students find the rest of them on their own in the computer lab, and write the answers in the "What they really were..." table. If you do decide to try this method, you will need this hint - After you search for the catalog number, it will pull up a page full of items. You have to look through the list until you see your catalog number under a picture. If you click on the picture, it gives a lot more information than the catalog card. Sometimes it even tells the story of how the object was found; the items were not always found by archaeologists, you know. :)
    2. Since I am always pressed for history time, I just call out the correct matches. The students write the correct answers to their incorrect guesses in the "What they really were..." table. [I could let them write all of the correct answers in that table, but it seems a bit much doesn't it?]

Enjoy!