
 Three years ago, I started teaching 4th grade. I was determined to make as much of my curriculum fun as I could. So anytime anything wasn't fun, I noticed. I'm sad to say that of all the subjects I taught that year, Alabama history was fun least often. I had not had Alabama history since I had been a 4th grade student myself. I remembered some things about Alabama history from back then (believe it or not), and some subjects in Alabama history were really just American history with Alabama contributions mixed in. The purely Alabama history subjects that were about areas other than the one in which I live were read from the book and discuss lessons. BO-ring.
One of those BO-ring lessons that stood out in my mind was the lesson about Moundville, a place where early Native Americans buried their dead in huge mounds along with their earthly possessions. After that lesson, I felt that the students just didn't "get" how cool Moundville is. They didn't get how cool it is that the mounds still exist, that artifacts are still being found even though the people lived in an ancient time, and that archaeologists are able to learn what those people were like based on what they found/are finding.
So, two summers ago, I was determined to find and make resources to make my history lessons more meaningful and fun. The first thing I did was look for something like this:

An archaeology kit that allows an entire class of students to experience an archaeological dig. But I didn't find it until today!
I did find other kits that were hundreds or even thousands of dollars. Some of those had real artifacts that had to be sent back...completely intact. Yeah right. I teach elementary school...and I am clumsier than my students.
This kit looks great and appropriate for elementary school. The kit includes many artifacts which include beads, arrowheads, pottery shards (that will piece together to make pottery), animal bones (replications), and shells, as well as an archaeology digging screen. The teacher can simulate these into an actual dig site (like in the dirt outside) so that the kids can participate in an excavation, and the students can draw conclusions based on the artifacts after they have dug them up.
The kit costs $69.95 and includes enough artifacts for 25 students to make arrowhead necklaces. They also offer refill packs of arrowheads, bones, beads, shells, and necklace cords that can be bought for groups larger than 25. Personally, I would probably save the artifacts and reuse them, but the necklaces look like fun, too! Visit the website to see refill prices.
Caution:
I did find other kits that were hundreds or even thousands of dollars. Some of those had real artifacts that had to be sent back...completely intact. Yeah right. I teach elementary school...and I am clumsier than my students.
This kit looks great and appropriate for elementary school. The kit includes many artifacts which include beads, arrowheads, pottery shards (that will piece together to make pottery), animal bones (replications), and shells, as well as an archaeology digging screen. The teacher can simulate these into an actual dig site (like in the dirt outside) so that the kids can participate in an excavation, and the students can draw conclusions based on the artifacts after they have dug them up.
The kit costs $69.95 and includes enough artifacts for 25 students to make arrowhead necklaces. They also offer refill packs of arrowheads, bones, beads, shells, and necklace cords that can be bought for groups larger than 25. Personally, I would probably save the artifacts and reuse them, but the necklaces look like fun, too! Visit the website to see refill prices.
Caution:
The teacher will have to supply digging tools for the class. I am going to look for some, and I will let you know as soon as I find some!
UPDATE:
UPDATE:
I found the following tools (4 out of 5 came from Amazon.com) that may work well for this archaeology dig activity:

This set includes 12 wax carvers that look a whole lot like some of the archaeologist tools I have seen on the Internet. There are other pictures of these on the website, and they look pretty blunt, but I do not know that for sure. They are not all they same, but they do not all need to be the same. For this activity, I just want the kids to get the idea of what archaeologists do.
Since I live in an area of Alabama clay (yep that famous red dirt that Warner Von Braun thought would be magnificent for NASA), I think these wax carvers would be great for getting that thick stuff off of whatever is buried in it. [I need to find an area that has a good mix of dirt and clay...or the following sieves will have no point.]
Sieves by The Learning Shop $1.99 each

These would be great for sifting dirt. I'm not sure how big they are though; they look pretty small.

This set includes 4 buckets - 3 with sieve bottoms and 1 with a solid bottom. The buckets are pretty small, they are 7" high.
Let me pause now and point out that it may be wise to ask any teachers in the younger grades if they have any of these kinds of play toys that they use in sand and/or water tables that you may borrow. You may even want to e-mail the staff at school to see if anyone with young children have these kinds of toys you can borrow. ...Just a thought...and now to continue:
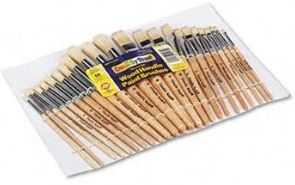
You probably already have paintbrushes or you know where you can borrow some. If not, these are pretty cool. This set includes a 24 pack of assorted paintbrushes. You can actually get them cheaper on the same site ($7.33 on Amazon), but you would have to pay shipping.
If you would like to go the extra mile...

This kit comes with 4 brushes, 4 sieves, and 24 plastic dinosaur skeletons. The brushes and sieves would be useful for this archaeology excavation, and this kit is actually pretty cheap.
If the dinosaur skeletons do not break easily, it may be fun to bake the little plastic dinosaur skeletons into big sheet cakes or individual cupcakes for a paleontology excavation activity. A variety of sweets could even be used to make strata - pudding, packed crushed oreos, cake, frosting, etc. I'm not sure how easily the dinosaurs break, so use caution when deciding whether or not to use that idea.
Let me know if you and/or your class use these activities! I would love to hear about it. I would love to see photos, too!
Enjoy!


